

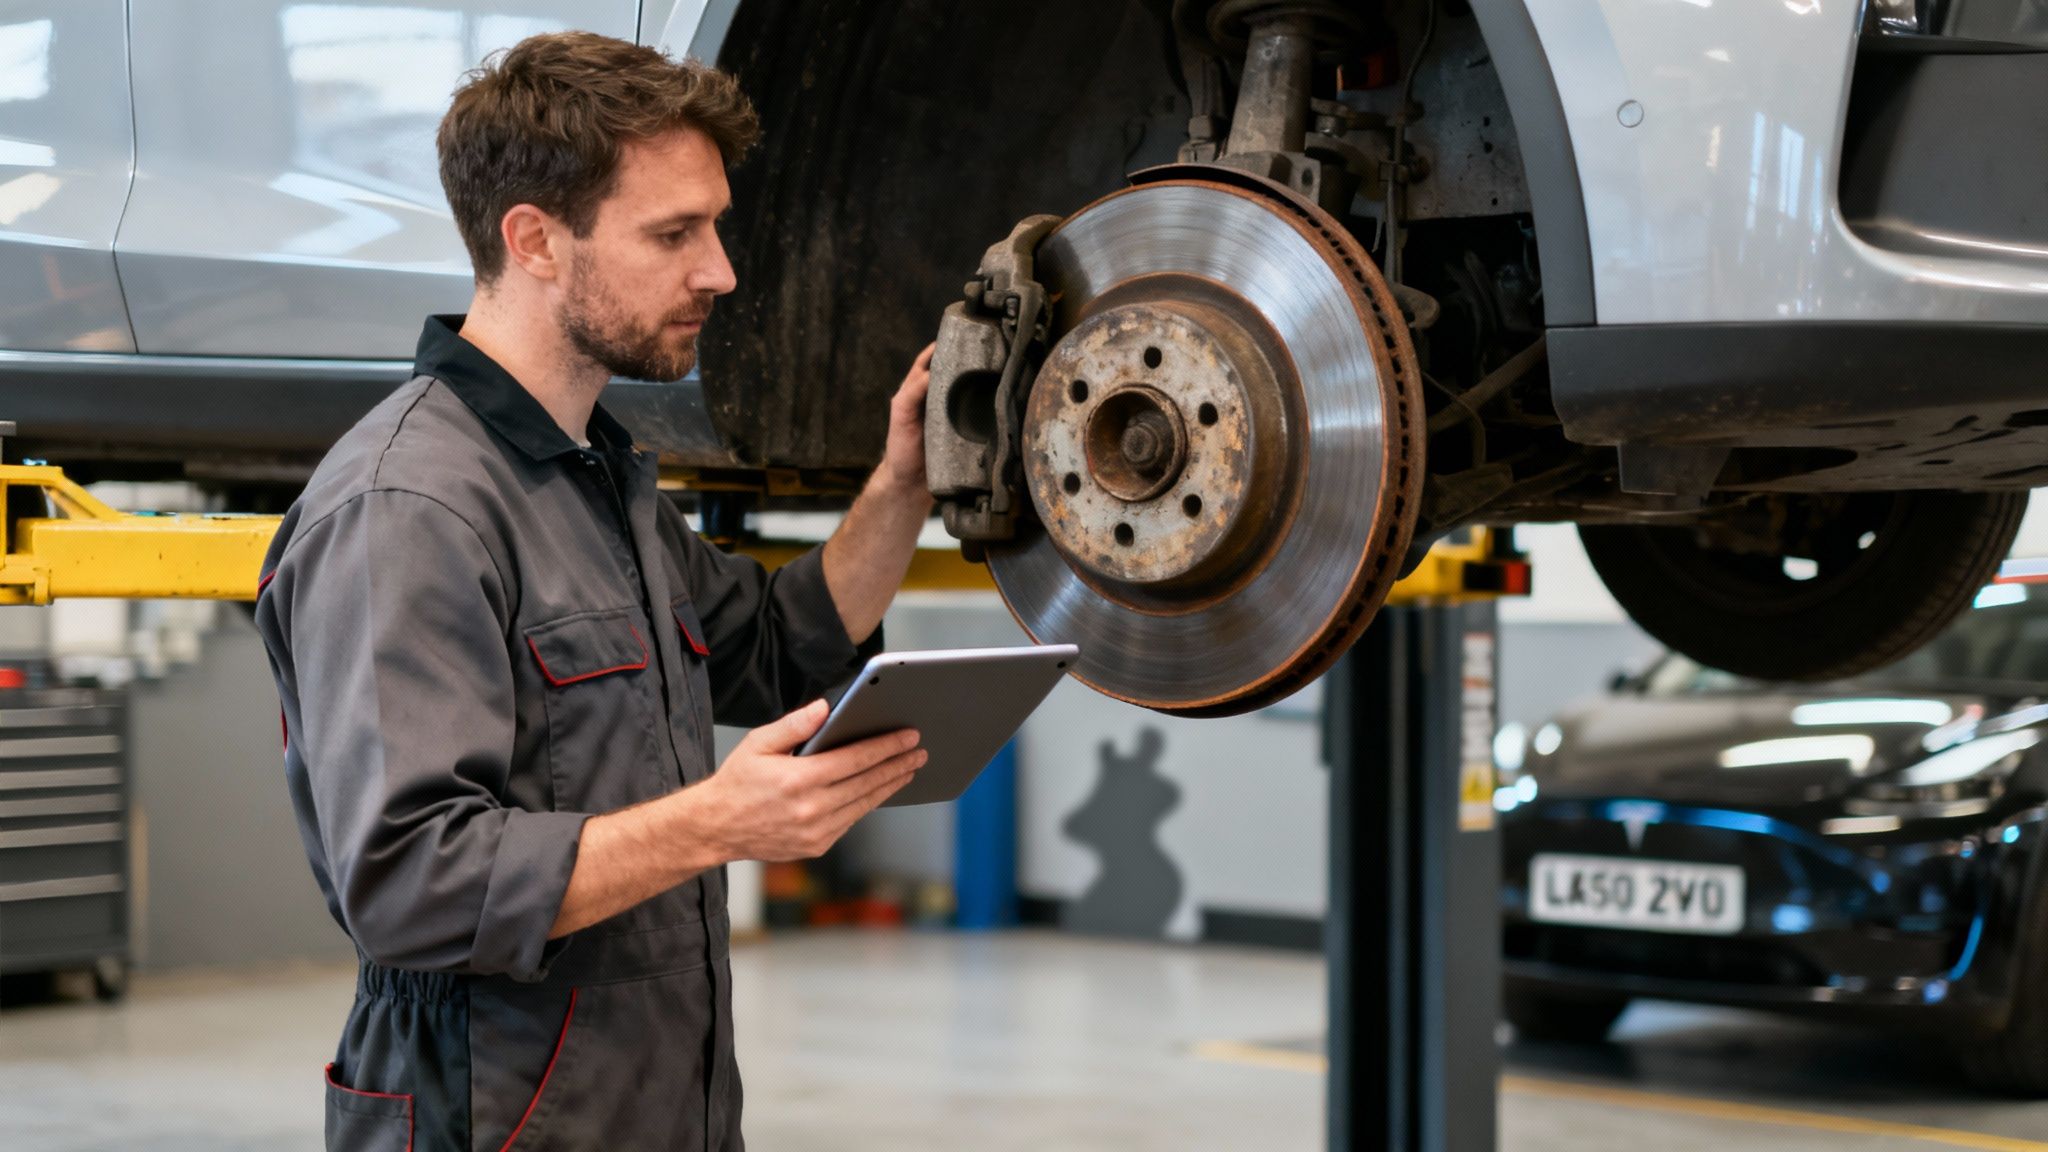
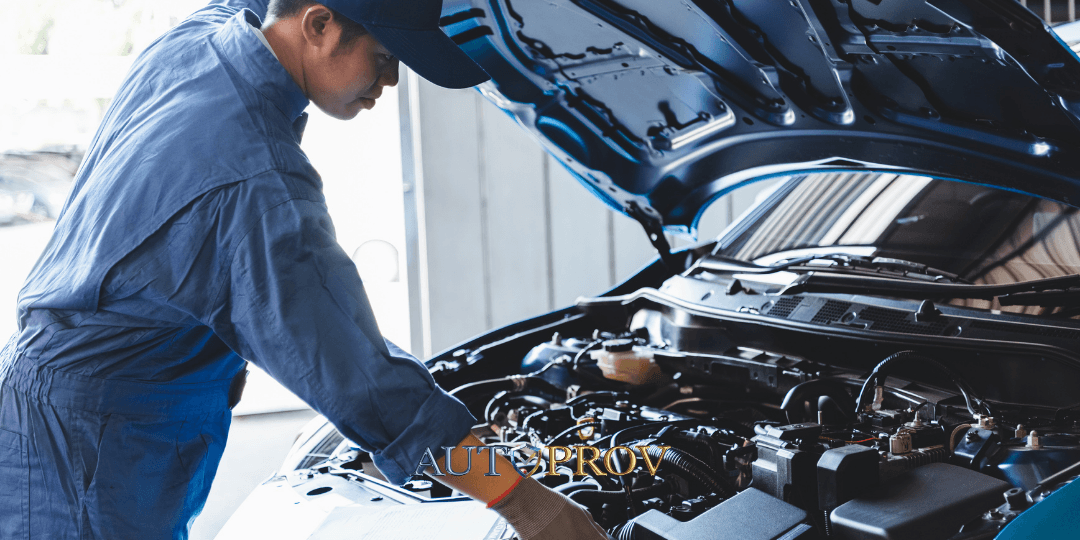
For any UK motor trader, a brake disc replacement is more than a workshop task—it's a critical component of risk management. Appraising a vehicle with undisclosed brake defects can lead to significant reconditioning costs, impacting margins and undermining your professional reputation with every vehicle that leaves the forecourt.
Why Brake Disc Condition is a Critical Risk for Motor Traders
A brief visual check through the alloy wheels during appraisal is insufficient for a professional risk assessment. Acquiring a vehicle with compromised brakes directly erodes profitability and exposes the business to unnecessary liability. The first step towards smarter, safer, and more profitable stock acquisition is a thorough understanding of the factors contributing to premature brake wear.
This guide combines essential mechanical best practices with the insights derived from in-depth vehicle provenance intelligence. We will analyse why modern vehicles place greater demands on their braking systems and explain why factors such as increased vehicle weight, typical UK driving conditions, and incomplete service histories should make brake integrity a primary focus during vehicle appraisal.
Modern Challenges to Brake System Longevity
Several trends in contemporary vehicle design have placed braking systems under unprecedented strain. This means that even relatively new, low-mileage stock can present with significant brake disc wear. Identifying these risk factors during appraisal is a key aspect of motor trade risk management.
- Increased Vehicle Weight: The prevalence of SUVs and Electric Vehicles (EVs) places substantial stress on brake components. A higher kerb weight requires the dissipation of greater kinetic energy as heat to slow the vehicle, accelerating the wear of discs and pads.
- UK Driving Conditions: The UK's road network presents a challenging environment for vehicles. A combination of congested urban traffic, frequent stop-start driving, and a damp climate creates ideal conditions for accelerated brake wear. The addition of road salt during winter further promotes corrosion of discs and seizure of calipers.
- Inconsistent Service Histories: A missing service stamp or a significant gap in a digital service record is a major risk indicator. Neglected brake fluid changes or a history of fitting substandard parts often leads to premature system failure—a liability that is passed on to the buyer.
Beyond the Visual Inspection
Relying solely on a visual check through the wheel is a significant commercial gamble. A disc may appear serviceable on its outer face but could be warped, heavily corroded on the inner face, or worn below the manufacturer's specified minimum thickness—a definitive MOT failure.
This is where analysing a vehicle's background provides critical context. By conducting a comprehensive vehicle history check UK traders rely on, you can identify ownership patterns that suggest a harder operational life than the mileage might indicate. A history of short-term ownership or evidence of high-mileage fleet use are strong signals that a thorough brake inspection is not just advisable, but essential.
Understanding a vehicle's complete provenance enables accurate management of importance of its maintenance provenance checks and, critically, allows for correct vehicle valuation.
Professional Diagnosis of Worn Brake Discs
Guesswork has no place in the professional diagnosis of brake disc condition; it is a direct threat to profitability. A robust assessment combines a methodical physical inspection with the sensory feedback gained only from a road test. This process allows a skilled professional to differentiate between routine wear and costly neglect—a critical distinction for any potential stock vehicle.
This assessment is not merely about fault-finding. The state of the braking system provides a narrative about the vehicle's previous use and the quality of its maintenance. For a motor trader, this narrative is vital trade vehicle intelligence.
The Physical Inspection Checklist
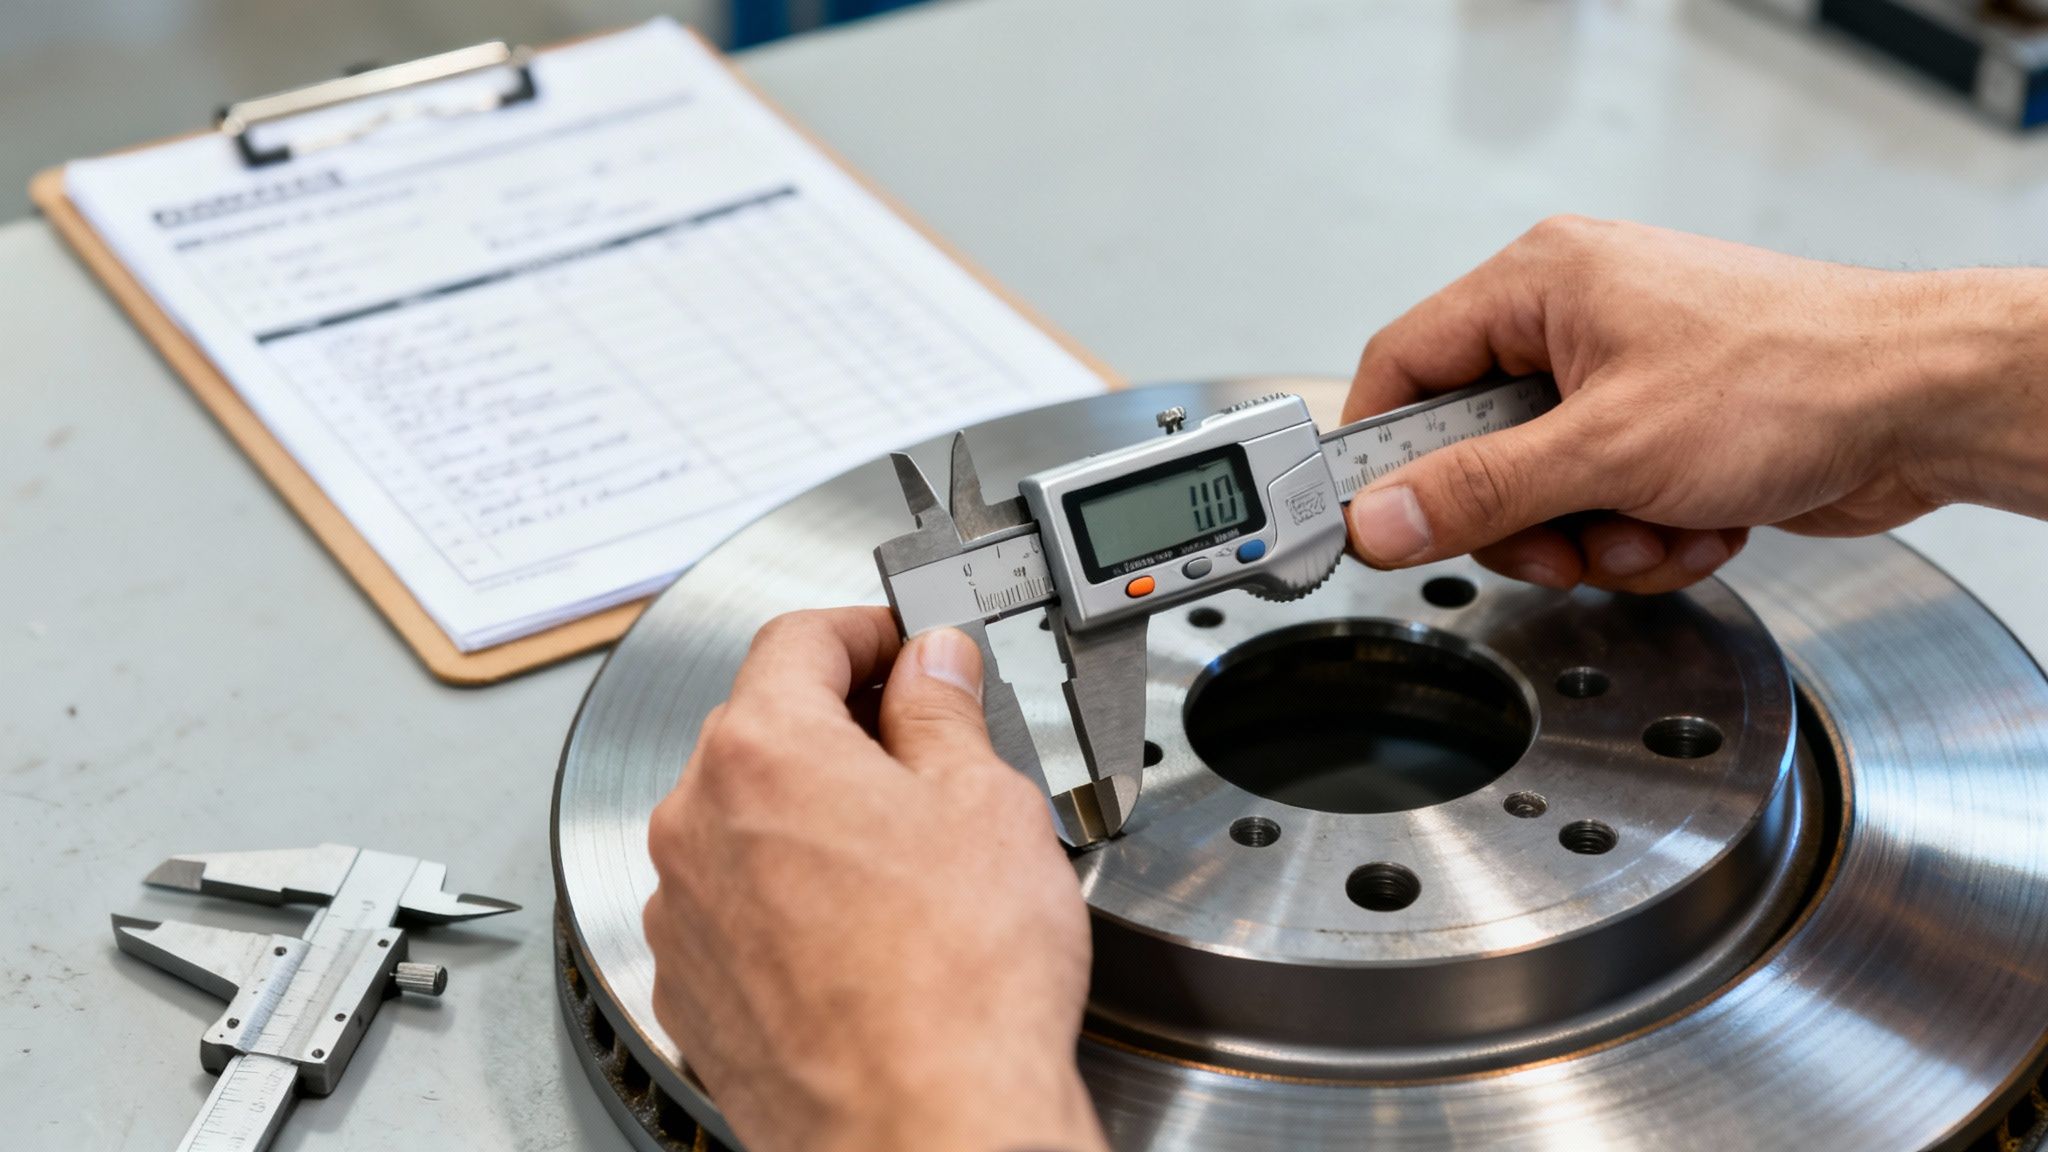
Before starting the engine, a systematic, hands-on inspection provides the most reliable data. Carefully assess the disc surface (ensure it is cold) and use precision measuring tools for accurate evaluation.
- Minimum Thickness: This is a non-negotiable parameter for safety and MOT compliance. Use a digital caliper or brake disc micrometer to measure the disc thickness at several points. Compare the reading to the minimum thickness (MIN TH) value stamped on the disc hub. If the measurement is at or below this value, an immediate brake disc replacement is required.
- Surface Condition: Examine the disc for deep scoring or grooves, which often indicates that debris was trapped between the pad and disc, or that the pads have worn down to their metal backing plate. Also, inspect both faces for heavy pitting or corrosion.
- Lipping: Assess the outer edge of the disc. A pronounced lip indicates significant wear, as this section is not in contact with the brake pad. A substantial lip is a clear sign that the disc is approaching the end of its service life.
- Signs of Overheating: Blue or dark discoloration on the disc surface is a classic sign of excessive heat exposure. This can compromise the disc's structural integrity, leading to warping or premature failure.
Interpreting Noises and Sensations
A short road test is essential for diagnosing issues that are not visible. Pay close attention to the vehicle's behaviour under braking—audible and tactile feedback through the brake pedal and steering wheel provides direct evidence of the braking system's health.
The table below provides a quick reference for connecting observed symptoms to their likely causes and the required remedial actions.
Brake Wear Symptoms and Their Likely Causes
Symptom Likely Cause (Disc-Related) Recommended Action High-Pitched Squeal Pad wear indicators making contact. Inspect pads immediately; likely need replacement. Harsh Metallic Grinding Pads worn to the metal backing plate. Cease driving. Requires immediate replacement of pads and discs. Vibration/Judder Warped or unevenly worn discs (DTV - Disc Thickness Variation). Measure for run-out and thickness variation. Replacement is almost certain. Spongy Pedal Feel Can indicate overheating and fluid issues, but check disc condition too. Inspect for overheating signs (discoloration) and check fluid. Pulling to One Side Uneven wear or a sticking caliper causing one disc to overheat. Inspect both sides for differences in wear, colour, and caliper function. This table serves as a foundational guide, but a comprehensive diagnosis must consider the entire braking system, not just the discs.
A high-pitched squeal is often caused by the integrated wear indicators on brake pads signaling they are nearing their service limit. A harsh, metallic grinding noise, however, indicates a much more severe issue. This sound is produced when the pad's friction material is completely depleted, causing the metal backing plate to grind directly against the disc, resulting in significant damage.
Another critical symptom is brake judder—a vibration felt through the steering wheel or brake pedal, particularly when braking from higher speeds. This is almost always caused by warped discs or Disc Thickness Variation (DTV), where inconsistencies in the disc's thickness cause the pads to pulse against the surface during rotation. Trade data suggests a significant percentage of vehicles acquired have some degree of disc warping, a rectification that can easily exceed £400 per axle.
The issue of brake neglect is a significant concern for the motor trade. A vehicle's MOT history can reveal past advisories for brake wear, but it does not always provide the complete picture. You can learn more about how to view MOT history and make smarter buying decisions to identify these patterns early.
Historical data indicates a rise in brake disc replacements following the 2022 implementation of the Vehicle General Safety Regulation. This mandate for advanced braking technologies has contributed to a projected increase in aftermarket demand. For multi-site operations, risk indicators within a dealer vehicle checks platform can help mitigate exposure to vehicles where provenance issues may conceal underlying brake system neglect. UK police statistics note that braking system defects are a contributory factor in 7% of serious road traffic collisions.
Selecting the Right Parts with Vehicle Provenance
Selecting the correct brake discs involves more than matching a part number. To avoid costly rework and protect margins, it is essential to understand the vehicle's true operational history. Choosing OE-quality or premium aftermarket parts based on vehicle provenance data is a hallmark of a professional operation.
Vehicle provenance intelligence provides the necessary context to elevate parts selection from a simple lookup to a strategic decision that enhances safety and reinforces the quality of your work.
Linking Provenance to Part Specification
A vehicle's history provides critical data that should directly inform parts procurement. A standard used car history report is a starting point, but genuine provenance intelligence reveals the complete narrative.
- MOT History: A history of repeated brake-related advisories suggests persistent issues or a previous owner's tendency to choose the cheapest repair option. This is a strong indicator that upgrading to premium or heavy-duty components is a prudent long-term solution.
- Ownership Patterns: A vehicle with a history of multiple short-term owners or a past life as a high-mileage fleet asset has likely been subjected to demanding use. For such a vehicle, standard-specification discs may be inadequate. Upgrading to high-carbon or performance-oriented discs can provide the required durability.
A key decision in any brake service is evaluating Aftermarket Parts vs OEM. Understanding the distinction is vital for matching the correct part to the vehicle's specific history and intended use.
Choosing the Right Type of Brake Disc
The type of disc fitted should be appropriate for the vehicle and its likely usage profile. A direct like-for-like replacement is not always the optimal choice, especially when the vehicle's provenance indicates a demanding past.
- Solid Discs: Primarily found on older, lighter cars or the rear axle of smaller vehicles. They are the most basic design and are unsuitable for heavier or performance-focused applications.
- Vented Discs: The standard for most modern vehicles. A central channel with internal vanes allows for efficient heat dissipation, significantly improving cooling and reducing brake fade. This is the default choice for virtually all front-axle applications.
- Drilled and Grooved Discs: Performance-focused designs offering enhanced heat and gas dissipation, vital under heavy braking conditions. The drillings and grooves also help clear water and debris from the disc surface, maintaining consistent performance. They represent a sensible upgrade for heavy SUVs, performance cars, or any vehicle with a history of towing.
Uncovering the original factory specification is a crucial first step. Detailed build data, such as that provided by AutoProv, can confirm the exact components fitted from new, providing a solid baseline for replacement or upgrade decisions.
UK motor traders must adapt to a changing market. The frequency of brake disc replacement is increasing as the UK's car parc grows. With many of these vehicles covering significant annual mileage, component wear is accelerating. Standard disc brakes, which retain a majority market share, typically require replacement every 50,000-70,000 miles under normal UK driving conditions. Advanced trade vehicle intelligence can flag mileage discrepancies and ownership patterns that signal the risk of premature brake wear.
A Professional Guide to Brake Disc Replacement
Executing a brake disc replacement correctly is a non-negotiable standard for any professional motor trade business. The procedure is more than just swapping components; it is a systematic process that directly impacts vehicle safety, your business's reputation, and profitability. There is no room for shortcuts.
This guide assumes a proficient level of mechanical competence but focuses on the best practices that are frequently overlooked—the details that prevent costly, reputation-damaging rework. We will cover the entire process, from safe vehicle preparation to the critical steps of hub cleaning and correct reassembly.
For workshops aiming to standardise quality, adopting a clear standard operating procedure template can ensure consistency and facilitate staff training for complex tasks like this.
Vehicle Preparation and Safe Disassembly
Before commencing work, ensuring the vehicle is secure is the absolute priority. The vehicle must be on a solid, level surface with the parking brake applied. Always chock the wheels on the axle not being worked on.
Raise the vehicle using a professional-grade jack and immediately secure it on correctly rated axle stands. Never work on a vehicle supported solely by a jack. With the wheel removed, you can begin disassembly.
First, retract the caliper piston. A G-clamp or a dedicated piston retraction tool is suitable, but always remove the brake fluid reservoir cap first to relieve pressure and prevent damage to the master cylinder or ABS modulator. Monitor the fluid level to prevent overflow.
Caliper and Carrier Removal
Once the piston is retracted, the caliper can be unbolted. It is typically secured by two slider pins, often protected by plastic dust caps. With the bolts removed, the caliper should slide clear of the carrier. It must be supported correctly using a bungee cord or a dedicated caliper hook. Never allow the caliper to hang by its flexible brake hose, as this can cause catastrophic failure.
Next, remove the brake pads. They should slide out of the carrier, though they may require gentle persuasion if corroded in place. Now, remove the caliper carrier itself. The bolts securing the carrier are larger and torqued to a high specification, often requiring a long breaker bar to loosen.
Tackling Seized Discs and Hub Preparation
This stage can often present challenges. Many brake discs are secured by a small retaining screw prone to corrosion and shearing. An impact driver is the recommended tool for removal.
If the disc is seized onto the hub through corrosion, resist the urge to use excessive force with a heavy hammer, as this risks damaging the wheel bearing. Begin by applying a quality penetrating fluid to the centre bore and around the studs. A few firm, controlled strikes with a copper or dead-blow mallet on the rear of the disc will typically break the corrosion bond.
With the old disc removed, you reach the most critical—and most frequently neglected—step of the entire process: hub preparation.
The mating surface between the new disc and the wheel hub must be meticulously clean. Any residual rust, dirt, or corrosion on the hub face will cause disc run-out, leading to brake judder almost immediately after new components are fitted.
Use a wire brush, an abrasive wheel, or a dedicated hub cleaning tool to remove all traces of corrosion. The goal is a bare, clean metal surface. A very light smear of copper-based grease may be applied to the hub face (not the studs) to prevent future seizure, but it must be used sparingly.
This simple workflow helps visualise how combining data with physical checks leads to the correct part selection every time.
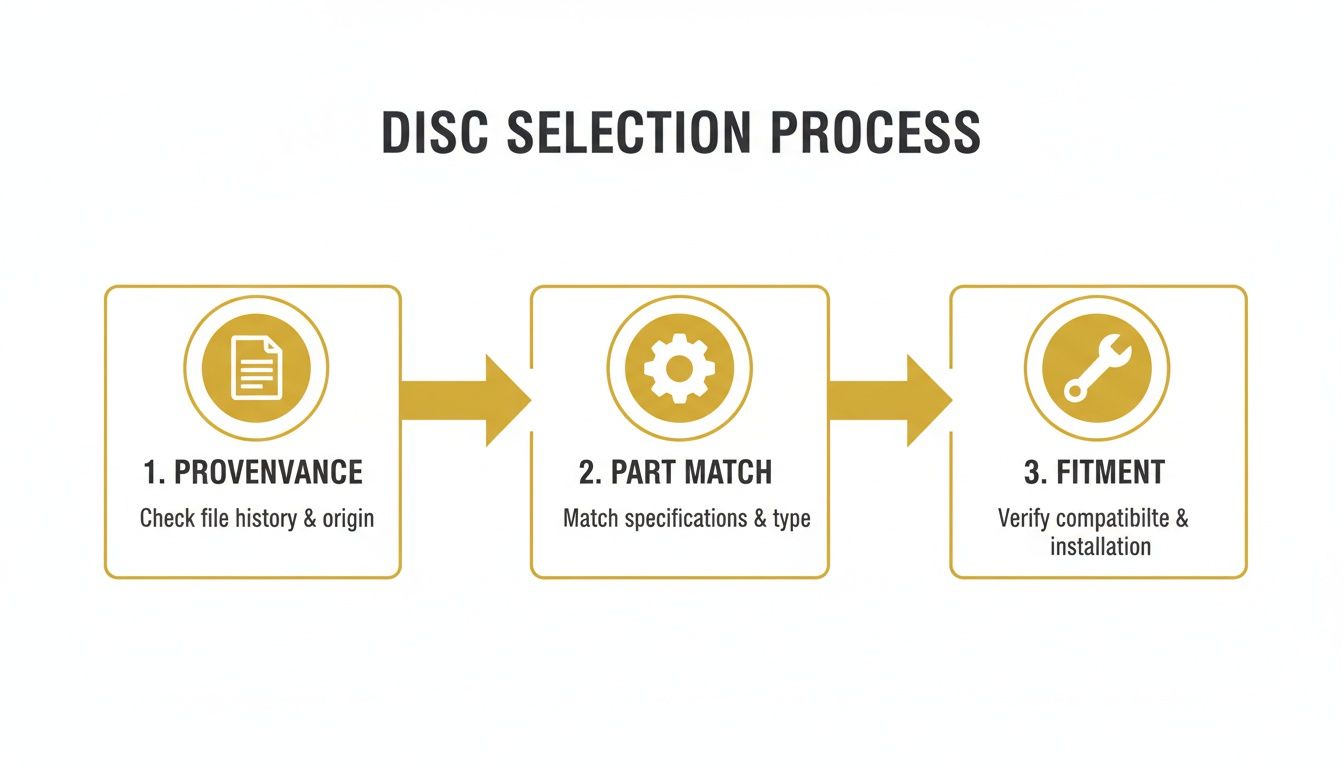
This process ensures that insights from the vehicle's history inform the selection of the correct specification part, which is then verified for correct physical fitment.
Reassembly and Torque Specifications
Fit the new disc onto the cleaned hub, securing it with the retaining screw if applicable. Reinstall the caliper carrier, ensuring the bolt threads are clean. Always use a calibrated torque wrench to tighten the carrier bolts to the manufacturer's specified setting. Over-tightening can stretch the bolts, while under-tightening presents a severe safety risk.
Install the new brake pads. It is good practice to apply a small amount of ceramic-based brake grease to the contact points on the carrier and the back of the pads where they meet the piston and caliper. For a more detailed examination of pads, refer to our professional guide to brake pad replacement.
Refit the caliper over the new pads and tighten the slider pins to their correct torque specification. Finally, before refitting the wheel, pump the brake pedal several times to seat the new pads firmly against the disc. Torque the wheel bolts to the manufacturer's specification in a star pattern.
Final Checks and Bedding-In Procedures
Bedding in a Disc Brake; https://youtu.be/BWQxGzHQZVU
With the new discs and pads fitted and the wheel bolts torqued, the job is not yet complete. The final checks and the critical bedding-in procedure are what distinguish a professional, reliable brake service from one that results in return workshop visits.
These final steps are non-negotiable for ensuring safety, performance, and the longevity of the newly fitted components. This is a critical quality control stage before the vehicle is considered ready for sale or return to a customer.
The Final Quality Control Checklist
Before the vehicle is driven, conduct a systematic final inspection. This is the last opportunity to identify any oversight during reassembly.
- Inspect for Fluid Leaks: Use a torch to thoroughly inspect the calipers, brake hoses, and bleed nipples for any sign of weeping brake fluid. The system must be completely dry.
- Check Pedal Feel: With the engine off, the brake pedal should feel high and firm. If it feels spongy or sinks towards the floor, there is air in the hydraulic system that must be bled immediately. Refer to our guide on how to change brake fluid for safer UK driving for further details.
- Reset Brake Wear Sensors: If new electronic wear sensors have been fitted, confirm that the corresponding warning light on the dashboard has been extinguished.
- Final Torque Check: It is best practice to re-check the wheel bolt torque once the vehicle is on the ground and its full weight is on the wheels.
Why the Bedding-In Process Cannot Be Skipped
The bedding-in process, also known as burnishing, involves mating the new pad friction material to the new disc surface. It consists of transferring a thin, even layer of friction material from the pads onto the disc face. This is essential for achieving maximum braking efficiency, preventing brake judder, and ensuring the longevity of the new components.
Skipping the bedding-in procedure is a false economy. It is the leading cause of noise complaints and vibration issues that arise shortly after a brake service, leading directly to rework and customer dissatisfaction.
When this process is rushed or omitted, uneven deposits of pad material form on the disc. This creates high spots that cause vibration under braking, a problem often misdiagnosed as "warped discs." A ten-minute bedding-in procedure can save hours of subsequent diagnostic work.
The objective is to subject the new components to a series of controlled heat cycles. This is not about aggressive braking to activate the ABS; it is about a progressive and safe build-up of temperature.
A Safe and Effective Bedding-In Cycle
This procedure requires a quiet, safe stretch of road where it can be performed without endangering other road users.
- From approximately 60 mph, apply firm, moderate pressure to the brake pedal to slow the vehicle to around 15-20 mph. Do not come to a complete stop or brake hard enough to engage the ABS.
- Accelerate back to 60 mph and immediately repeat the process. This cycle should be repeated 8-10 times to generate sufficient heat in the discs and pads.
- After the final deceleration, drive for several miles at a steady speed, using the brakes as little as possible to allow them to cool gradually.
- Finally, park the vehicle and allow the brakes to cool completely for at least an hour. If possible, avoid applying the parking brake firmly, as this can cause the hot pads to leave an imprint on the disc.
In the UK, braking defects are a factor in a significant number of reported road accidents. By completing every brake disc replacement with this level of professional diligence, you are not just completing a task—you are actively managing risk for your business and your customers. For a wider industry perspective, see this report on the automotive brake system market.
Questions We Hear in the Trade
In a professional workshop or sales environment, clear and accurate information is paramount. Here are common questions regarding brake disc replacement, with the straightforward, fact-based advice required to make sound decisions.
Is it Necessary to Replace Pads with Discs?
Yes, without exception.
Fitting used pads onto new discs is a critical error in judgement. This practice creates significant safety risks and is almost certain to result in premature component failure and customer complaints.
A used brake pad has worn to match the specific surface imperfections of the old disc. When fitted against a new, perfectly flat disc, it cannot make full, even contact. This results in severely compromised braking performance from the outset.
Furthermore, this poor contact will wear uneven patterns into the new discs, leading to premature failure, brake judder, and noise. Critically, it will invalidate any manufacturer's warranty on the new parts, leaving you liable for the cost of rectifying the issue. For reasons of safety, performance, and professional integrity, a new set of high-quality pads must always be fitted with new discs.
What is the MOT Stance on Brake Discs?
The UK MOT inspection includes clear, strict criteria for brake discs. A failure can delay a sale or require costly last-minute repairs. Understanding these standards is essential for professional compliance.
A vehicle will fail its MOT if a brake disc is:
- Significantly worn below the manufacturer’s specified minimum thickness.
- Insecure, fractured, or showing cracks that compromise its structural integrity.
- Otherwise likely to fail, a clause covering conditions such as excessive scoring, deep pitting, or heavy corrosion that weakens the disc.
As a motor trader, it is vital to ensure any brake disc replacement not only meets but comfortably exceeds these minimum standards. This ensures the vehicle is compliant, roadworthy, and will not generate MOT-related issues post-sale.
Must Discs Be Replaced on Both Sides of an Axle?
Yes, absolutely. Brake components are always replaced in axle pairs—both front or both rear sets together. Replacing a single disc on an axle is unsafe and unacceptable under any circumstances.
Replacing only one side creates a dangerous braking imbalance. The new components will have a significantly higher coefficient of friction than the worn parts on the opposite side. Under firm braking, this imbalance will cause the vehicle to pull violently and uncontrollably to one side.
This practice is not merely substandard; it is a major safety hazard and constitutes an immediate MOT failure. Even if one disc appears to be in better condition than the other, replacement as a matched pair is non-negotiable for safe, predictable braking performance.
This principle is fundamental to vehicle safety and a core tenet of professional workshop practice.
How Do I Determine if a Vehicle Needs High-Carbon Discs?
High-carbon brake discs offer superior thermal management. They dissipate heat more effectively, making them more resistant to warping and brake fade under heavy use. The decision to fit them depends on two factors: the original factory specification and the vehicle's operational history.
High-carbon discs should be fitted if:
- They were part of the original vehicle specification. This is common on premium, performance, or heavy vehicles. A professional dealer vehicle checks platform can often confirm the original build sheet.
- The vehicle's provenance suggests a demanding operational life. This is where vehicle provenance intelligence provides a commercial advantage.
- A comprehensive vehicle history check UK report identifies factors such as ex-police or emergency service use, evidence of towing (indicated by towbar fitment and specific ownership patterns), or a history as a high-mileage commercial vehicle.
These indicators from a vehicle's past are strong signals that standard-specification discs may be insufficient. Upgrading to high-carbon discs is a prudent, preventative measure that protects the vehicle from premature brake failure and your business from the consequences of selling a vehicle not fit for its likely purpose. This is where using trade vehicle intelligence transitions from a simple check to a strategic business tool.
At AutoProv, we provide the advanced vehicle provenance and risk intelligence that UK motor traders need to make more informed decisions. Go beyond basic checks and uncover the full story behind your next vehicle purchase. Visit https://autoprov.ai to see how our platform can protect your margins and your reputation.
Frequently Asked Questions
AI-Generated Content Notice
This article was created with the assistance of artificial intelligence technology. While we strive for accuracy, the information provided should be considered for general informational purposes only and should not be relied upon as professional automotive, legal, or financial advice. We recommend verifying any information with qualified professionals or official sources before making important decisions. AutoProv accepts no liability for any consequences resulting from the use of this information.
From our AI insights
- Navigating the UK's MOT Changes in 2024
Explore the key MOT changes in 2024 and what they mean for UK drivers.
- Understanding the DVLA's Role in Vehicle Maintenance
Discover how the DVLA influences your vehicle maintenance tasks in the UK.
- Preparing Your Car for Winter: Essential Maintenance Tips
Stay safe this winter with our essential car maintenance tips tailored for UK drivers.
Related Articles
The Importance of Car Maintenance and Provenance Checks
Discover why regular car maintenance and proper provenance checks are essential for vehicle quality and longevity.
Essential Car Maintenance Tips for UK Drivers
Discover vital car maintenance tips to keep your vehicle roadworthy and compliant in the UK.

How Much Is a Car Service? Complete UK Price Guide
Trying to pin down exactly "how much is a car service?" can feel a bit like asking "how long is a piece of string?". Prices vary quite a bit, but to give you a ballpark figure, an interim service will usually set you back around £100 to get started. A more thorough full service often begins at £180, while a major service for many cars can easily top £300.
Published by AutoProv
Your trusted source for vehicle intelligence
